Official Manual / Quick Start
Shadowrocket Setup Guide
Import existing details → Choose routing → Connect → Verify → Troubleshoot
This guide follows the steps for iPhone and iPad. First establish a connection you can verify, then adjust rules and On Demand settings. For more on protocol fields, see the protocol reference.
- Interface labels stay in English
- Change one setting at a time
- Record your settings before changing them
Step 01 / Add Server
Add a Server or Import an Existing Subscription
First, identify which type of connection details you have. If you have a subscription link that retrieves a server list, use Subscribe. If you have an individual server’s address, port, and authentication details, enter them manually using the appropriate Type. Choose one method; don’t split a subscription link into Host and Password, and don’t use an ordinary website URL as a subscription link. If you’re unsure what your details mean, check with your existing service provider before proceeding.
Import Using Subscribe
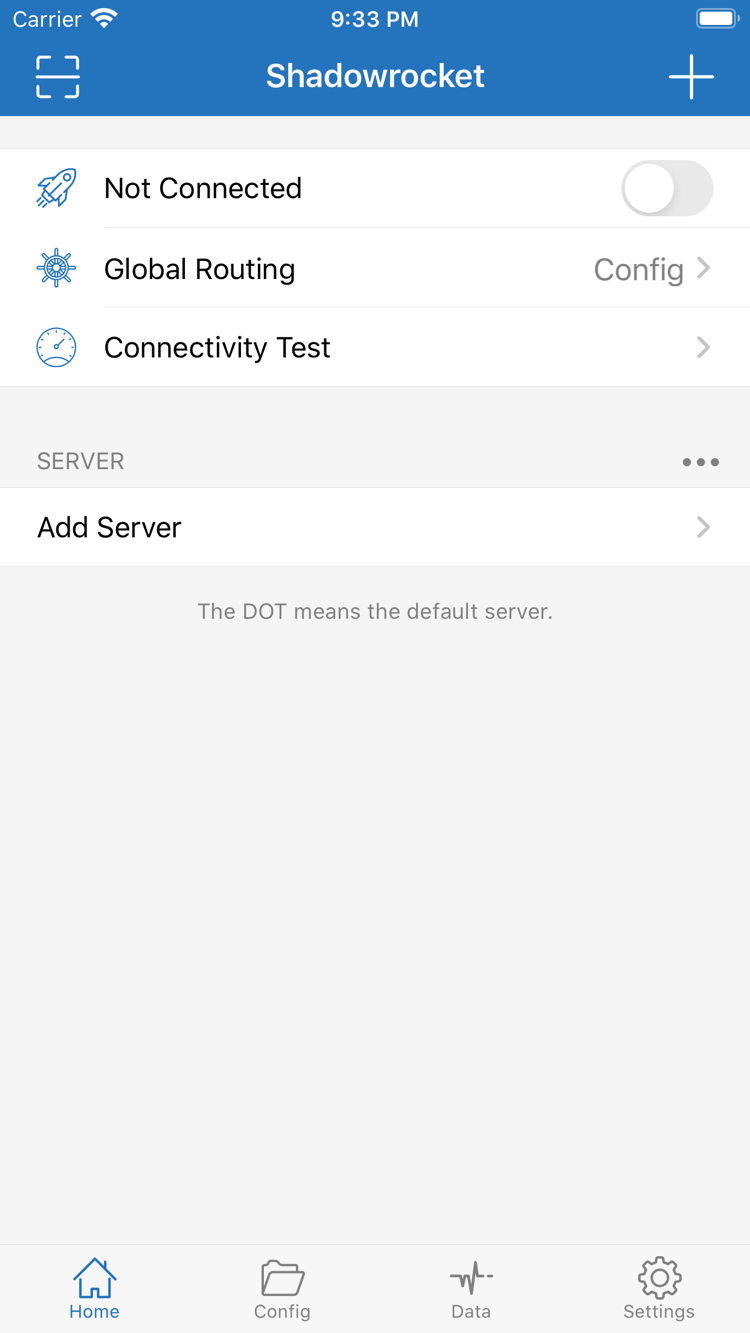
Open Shadowrocket and find Add Server on Home. Tap Type and select Subscribe. On the add screen, enter your full subscription link in URL and add a note to help identify it, then save. Preserve any query parameters in the link, and remove accidental spaces or line breaks at the beginning or end. Subscription links may contain access credentials, so don’t post them in comments, chat screenshots, or public documents.
After saving and retrieving the subscription content, return to Home to review the subscription group and its server entries. If you see a group name but no entries, first check whether the subscription content was retrieved successfully; don’t try to connect yet. If the details have changed, use the update action provided for that subscription entry, then check for the expected servers. Importing only adds connection details to the app; it doesn’t confirm that a server is available. Verify connectivity separately in a later step.
Enter Details Manually in Add Server
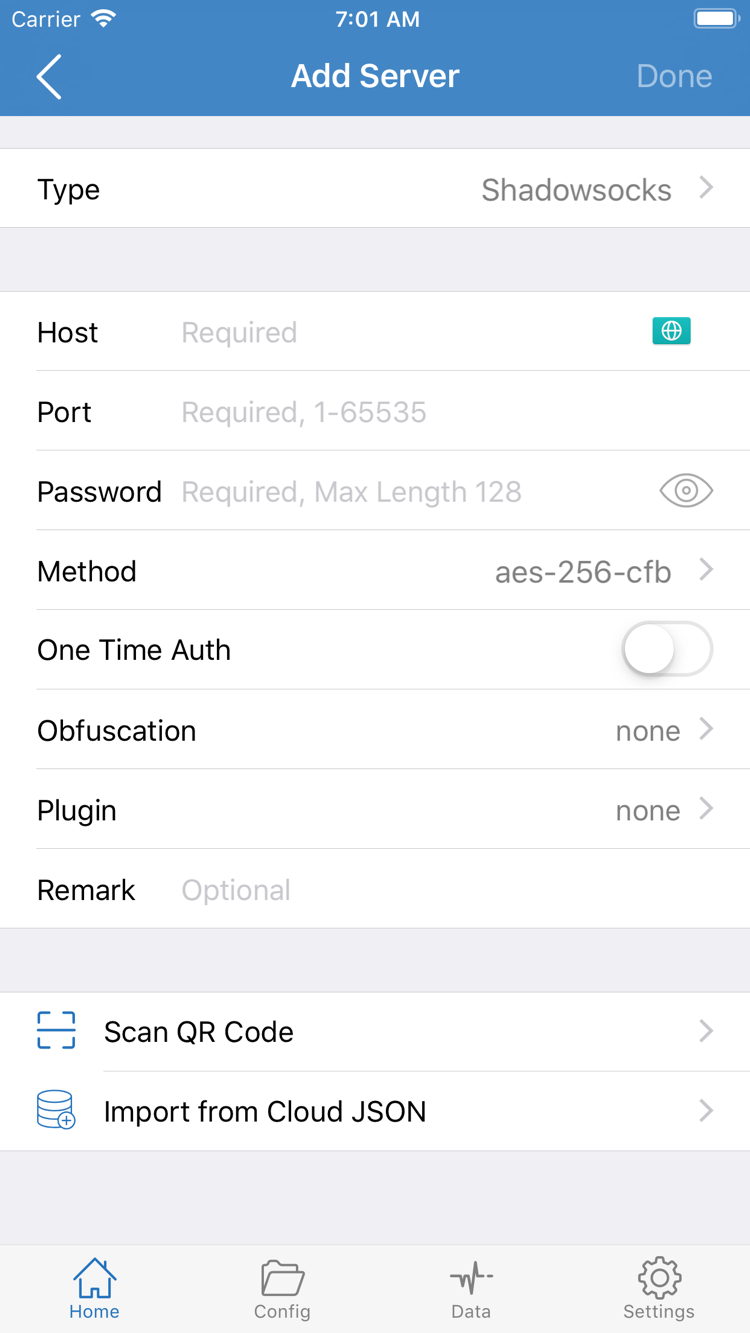
In Add Server, choose a Type first, then enter Host, Port, and the authentication fields required for that type. For example, Shadowsocks requires you to check Password and Method; other types may use different authentication, transport, or TLS fields. Don’t substitute fields just because their names look similar, and don’t enter a webpage URL with a path as Host. Match the server address, port, capitalization, and encryption method to your original details.
If you have a QR code for the connection details, use Scan QR Code to import them. Import from Cloud JSON is only for cases where you have details in that specific format. After importing, open the entry and check its Type and key fields. Save, return to Home, and confirm the entry appears under SERVER. Use a note to distinguish it from other entries. Keep the original details handy; next, choose a routing mode and select this server to connect.
Step 02 / Global Routing
Choose a Global Routing Mode
After saving your server details, return to Home and tap Global Routing. This setting controls how traffic is routed; it doesn’t fix server details. The three common modes are Config, Proxy, and Direct. Choose one for your current purpose before connecting. Selecting a server doesn’t mean every request will go through it.
Config: Match Traffic Against the Active Rules
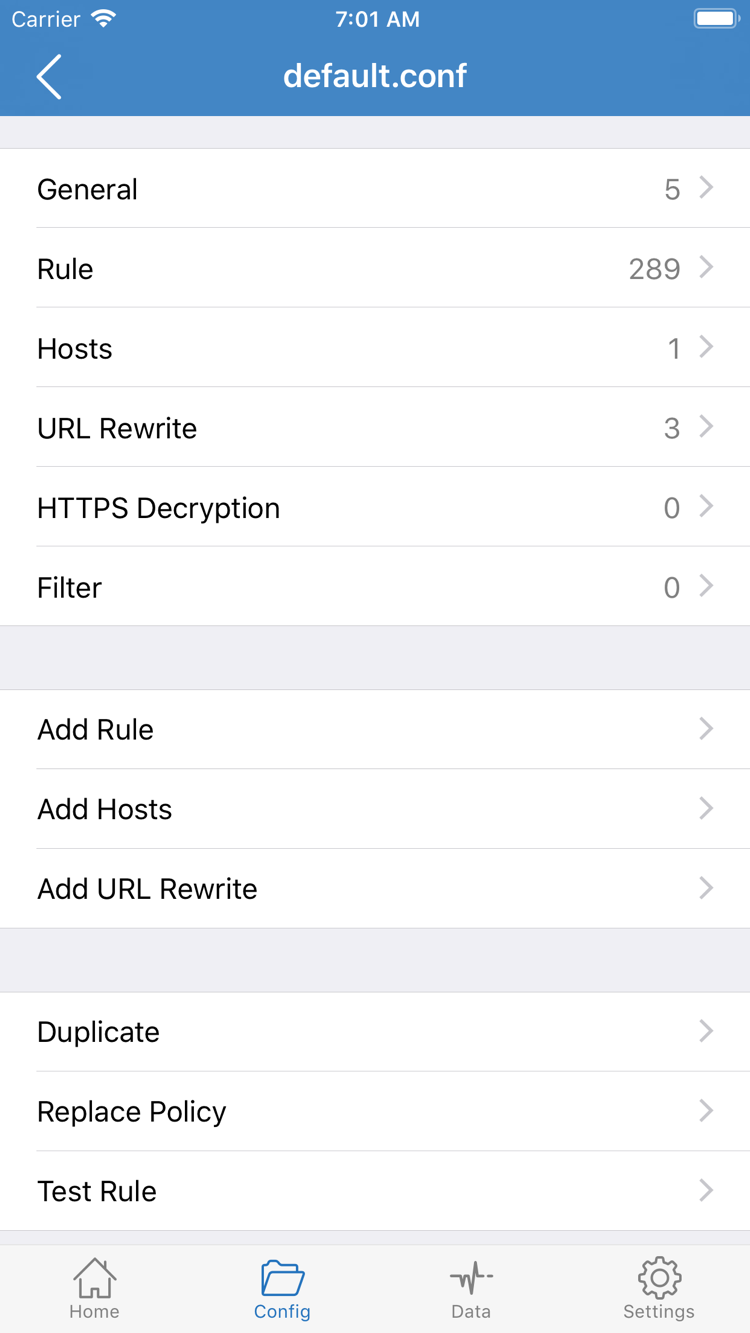
For rule-based routing, select Config, then open Config and confirm which configuration file is active. Open the configuration and check Rule, including the fallback rule at the end. Rules are generally matched in order, so specific domains should appear before broader rules. FINAL handles requests that haven’t matched an earlier rule. Editing an inactive configuration file won’t affect the routing of your current connection, so verify the file before making changes.
This rule snippet illustrates how matching works: example.com and its subdomains match PROXY; all other requests go to FINAL,DIRECT. It demonstrates rule syntax only and contains no server details. Don’t use it as a replacement for your complete configuration. Check your configuration and Home to confirm the actual outbound selection for PROXY. DIRECT means the rule requires a direct connection.
[Rule]
DOMAIN-SUFFIX,example.com,PROXY
FINAL,DIRECT
Proxy and Direct: Set the Current Routing Mode
Proxy routes traffic using the proxy mode. You can use it temporarily to isolate rule-related issues and check whether the selected server can access a destination. Direct uses a direct connection; success in this mode doesn’t prove the server works. Note the original mode before testing and restore it afterward. Otherwise, you may think your rules had no effect because the connection worked before but behaves the same after your changes.
When getting started, there’s no need to change DNS, HTTPS Decryption, and multiple rules at once. Keep your existing configuration, complete a connection test, then make changes one at a time. To compare the fields used by Shadowsocks, VMess, VLESS, Trojan, WireGuard, or Hysteria2, see the protocol reference. This guide continues with details you’ve already imported and checked.
Step 03 / Home
Select a Server and Connect
Return to Home and select the server you just checked under SERVER. Confirm the selection indicator is on the intended entry. Multiple entries in a subscription are separate connection options; the app doesn’t automatically determine which ones are available. For an easier-to-review test, select just one entry and note its label, your current network, and the Global Routing mode.
Approve the VPN Configuration Request
Turn on the connection switch at the top of Home. On your first connection, the system will ask to add a VPN configuration. Read the system prompt, make sure the request is from Shadowrocket, then follow the instructions to allow it and complete device verification. This authorization lets the app create a system network tunnel; it’s separate from your purchase status and subscription content. After approving, return to the app and check whether the status at the top has changed from Not Connected.
If you dismissed the system prompt, return to the app and try connecting again to bring up the authorization request. Don’t repeatedly tap the switch. You can also check the VPN configuration in system settings to see whether authorization was set up; the exact location depends on the system interface. If your device is managed or another VPN connection is active, check which configurations the device allows and its current connection status first. Don’t delete system configurations you don’t recognize.
Connection Status Doesn’t Verify Access
A change in the status at the top only shows that the app’s connection process has reached a particular state. It doesn’t prove that every destination is accessible. Server authentication, destination sites, rule matching, and name resolution can each fail independently. After turning on the switch, keep your current settings and don’t add rules yet. Continue with the Connectivity Test and real-world access check.
If the switch turns off immediately, note the message and when it happened: before system authorization, after authorization, or after a connection was established. This sequence can help distinguish an authorization issue from a connection-details issue. Don’t enable On Demand yet. Verify a manual connection first so automatic connections don’t affect your observations.
Step 04 / Connectivity Test
Verify the Connection and Routing
First, run Connectivity Test on Home and wait for it to finish before reviewing the result. A successful test means the test destination could be reached under the conditions at that time; it doesn’t verify every website, protocol, or server. A failed test doesn’t necessarily mean the server is unavailable. Also check the test destination, network status, and routing mode.
Move from Test Results to Real-World Access
Keep the selected server and Global Routing mode unchanged. Open a browser and visit a known destination where you can check the result. Reload the page and look for new content. Don’t judge the connection by a page that was already displayed; cached content can make a page look normal even when no new request was made. Don’t change your Wi-Fi, server, and routing mode at the same time, or you won’t know which change affected the result.
To compare results, note the current issue, change one condition, then repeat the same request. For example, keep the server unchanged and temporarily switch from Config to Proxy. If the result differs, review the rules, configuration, and their dependencies instead of re-entering all authentication details. Restore the original mode after comparing, then test your intended setup again.
With Config, Check Both PROXY and DIRECT
With Config selected, check at least one destination expected to use PROXY and one expected to use DIRECT. Open Data and find the new connection records for the relevant time. Use the available record details to check the destination, matching rule, and policy. Looking for a record immediately after making a request is easier than guessing among a long history. If needed, note the test time and domain.
If the policy doesn’t match your expectations, first confirm that the active file is in use, then check whether an earlier, broader rule matched first. Domain rules match the domain associated with a request, not the webpage title. A single page may request resources from several domains, so seeing the page load doesn’t necessarily mean every resource was routed as expected. Once verified, note the working server, routing mode, and configuration name as a baseline for future changes.
Three Questions to Answer When Testing
- Which server is selected on Home, and what is the current Global Routing mode?
- What were the results of Connectivity Test and the real page visit?
- With Config selected, does the policy in the connection record match the active rule?
Step 05 / Settings
Troubleshoot Based on Where the Issue Occurs
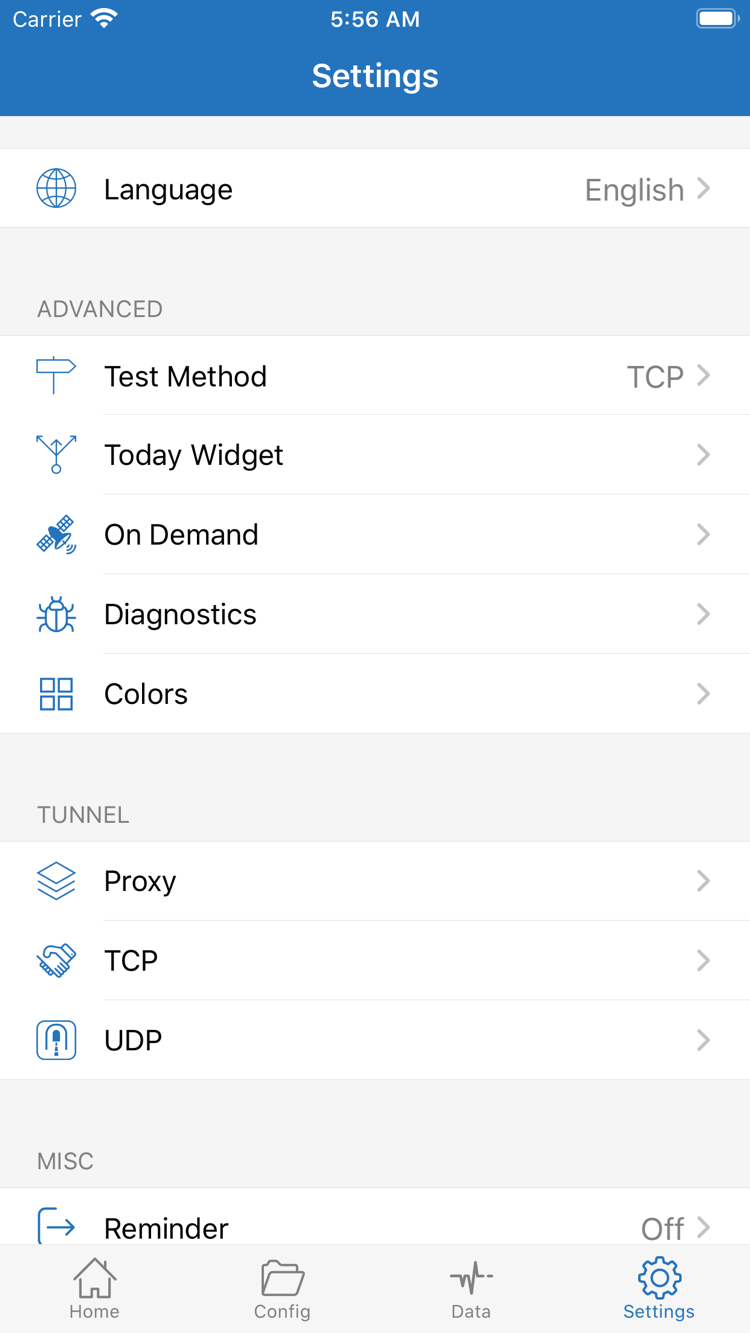
Start troubleshooting at the step where you got stuck; don’t repeat every setup step. Save your current configuration and note the error message and conditions that reproduce it. Change one thing at a time and repeat the same test after each change. In Settings, you can check options such as Test Method, On Demand, and Diagnostics. These settings can’t replace correct server details, so don’t change every switch at once.
Subscription Import Failed or No Server Entry Appears
Return to Add Server and check that Type is set to Subscribe, the URL is complete, and no spaces, line breaks, or missing parameters were introduced. Confirm that your current network can retrieve the subscription content, and check whether the details from your provider are still valid. A subscription URL and the server addresses it contains are different things: a failed subscription update doesn’t mean every saved server is unavailable, and a working server doesn’t prove the update URL can be reached.
The Switch Turns Off or the Connection Times Out
If the switch turns off, first check system VPN authorization and the current VPN status. For a connection timeout, confirm that your device has a working network, then check Type, Host, Port, and authentication fields one by one. For entries using TLS or a specific transport, compare those fields with the original details; checking only the password isn’t enough. Make sure the system date and time are accurate, since an incorrect clock can affect certificate or authentication checks.
Check Test Method in Settings to see which method is currently being used, then compare the results. If a test fails but a real request succeeds, first consider the test destination and method rather than deleting connection details based on one result. For more information, open Diagnostics and review the details for the operation you just reproduced. If only one server fails, check its details and the server-side status.
Connected, but Access or Routing Is Unexpected
First, return to Home and check Global Routing. Make sure you aren’t in Direct when you expect traffic to use a proxy. With Config selected, check the active file, rule order, and the policy for FINAL, then use the records in Data to investigate. If only one destination fails, note its address and the time. If all destinations fail, start with your basic network and server connection rather than adding more domain rules.
If the manual switch doesn’t behave as expected, check whether On Demand is enabled and whether any automatic connection conditions are set. For initial troubleshooting, switch back to manual connections and confirm that the results are consistent before configuring On Demand. Don’t change Proxy, TCP, UDP, and other settings all at once; they affect different things, and the more you change, the harder it is to identify the cause.
Keep Relevant Details Before Going Further
When checking details with a service provider you already use, share the protocol type, the issue, the test time, and the checks you’ve completed. Before sharing screenshots or diagnostics, hide your subscription link, password, authentication identifiers, and other connection credentials. For protocol details, see the protocol reference. To review the connection steps, return to Add or Import; keep the parts you’ve already verified instead of rebuilding every entry.